React Native projects often become cluttered with complex import statements, impacting readability and development speed. Alias imports offer a streamlined solution, enhancing your code's structure and simplicity.
In this post, we'll explore the common challenges developers face with messy imports in React Native projects and introduce you to the world of alias imports. Alias imports offers a cleaner and more maintainable approach to structuring your import statements. Say goodbye to import chaos and hello to a more organized and efficient React Native codebase!
Understanding Alias Imports
Alias imports in React Native allow you to shorten and clarify file paths or modules. Instead of lengthy import paths, you can use concise, descriptive aliases.
This not only makes your code cleaner but also more readable. For instance, compare these two import statements:
Traditional:
import { SomeComponent } from '../../../components/someComponent';
With Alias:
import { SomeComponent } from '@components;
Alias imports allow you to define shorter and more descriptive names for file paths or modules. Instead of grappling with lengthy import paths that resemble a roadmap, you can create aliases that streamline your code and enhance its readability.
Setting Up Alias Imports
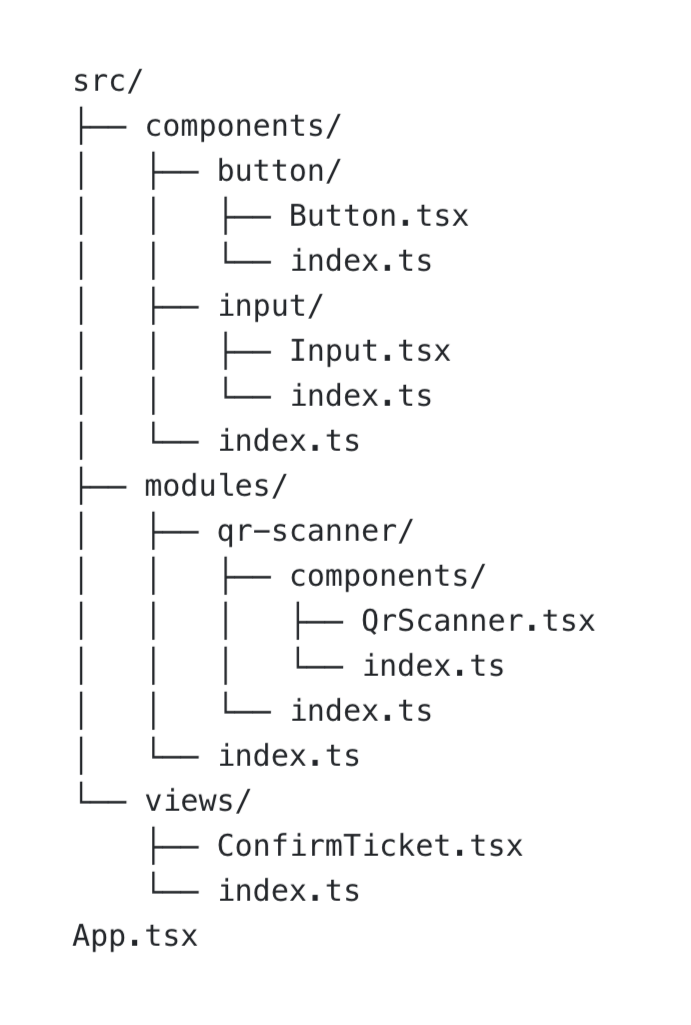
To implement alias imports, start with your project's structure. For example:
Next step is to add "baseURL" within "complierOptions" and configure "paths" as following in our tsconfig.json file:
{
 "extends": "@tsconfig/react-native/tsconfig.json",
 "compilerOptions": {
   "baseUrl": "src",
   "paths": {
     "@components": ["components/index"],
     "@modules/*": ["modules/*"],
     "@views/*": ["views/*"]
   }
 }
}Now we need to add Babel Module Resolver package to our project dev dependencies:
NPM:
npm install --save-dev babel-plugin-module-resolverYARN:
yarn add --dev babel-plugin-module-resolverWith the module resolver in place, the next step is to configure Babel to recognize and apply our alias imports. If you already have a babel.config.js file, great! Open it. If not, create a file named babel.config.js at the root of your project (or if you prefer, you can use a .babelrc file).
Now, add the following lines to your babel.config.js file:
plugins: [
   // ..other plugins if any
   [
     'module-resolver',
     {
       root: ['./src'],
       extensions: ['.js', '.ts', '.jsx', '.tsx', '.json'],
       alias: {
	  '@components: './src/components/index,
	  '@modules': './src/modules',
         '@views': './src/views',
       },
     },
   ],
],With these steps completed, you've successfully configured alias imports in your React Native project.
It's now time to look at practical examples of alias imports in action:
import { Button } from '@components;
import { Block } from '@prototyp/skeletor';
import React from 'react';


export const QrScanner: React.FC = () => {
 return (
   <Block>
     ..rest of the component code
     <Button />
   </Block>
 );
};import { Button, Input } from '@components;
import { QrScanner } from '@modules/QrScanner;
import { Screen } from '@prototyp/skeletor';
import React from 'react';
export const ConfirmTicket: React.FC = () => {
return (
<Screen>
..rest of the component code
<QrScanner />
<Button />
<Input />
</Screen>
);
};import { SkeletorProvider } from '@prototyp/skeletor';
import { ConfirmTicket } from '@views/ConfirmTicket;
import React from 'react';
export const App: React.FC = () => {
return (
<SkeletorProvider>
<ConfirmTicket />
</SkeletorProvider>
);
};Simplified Troubleshooting Guide:
Encounter issues? Here's how to troubleshoot common problems with alias imports:
- Caching Issues: Steps to reset cache with commands.
- Path Resolution: Tips for ensuring correct paths.
- Babel Configuration: Key points to check in your configuration.
1. Caching Woes: Changes Not Reflecting
If you find that changes to your alias configurations are not taking effect, it might be a caching issue. Babel and other tools might cache the configurations. To resolve this, try clearing the cache. You can do this by running the following commands:
NPM:
npm start -- --reset-cache
YARN:
yarn start --reset-cacheIf that don’t help restart TS server/reload window then delete/install node_modules and remove all watches and associated triggers:
rm -rf node_modules && yarn/npm i && watchman watch-del-allNow start Metro with `–reset-cache` options again and build the app.
2. Incorrect Path Resolution
Double-check the paths in your alias configurations. A small typo can lead to import errors. Ensure that the paths are relative to your project root or provide the correct path structure.
3. Babel Configuration Errors
In your `babel.config.js`or `.babelrc file`, ensure that the syntax is correct. A misplaced comma or a missing bracket can lead to unexpected behavior. Use a linter or a code editor with syntax highlighting to catch any configuration errors.
Recap time
Alias imports in React Native make your developer life easier. They simplify import statements, enhance code readability, and streamline project structure. By adopting this practice, you can significantly reduce development complexity and improve maintenance efficiency. The key to mastering alias imports lies in understanding their setup, application, and troubleshooting.
Embrace these techniques to elevate your React Native development to the next level.
Next Steps: Want to further enhance your React Native experience? Explore our in-house toolkit, @prototyp/skeletor, designed to rid ourselves of any/all growing pains we have when working on a new react-native project, whether it’s building screen layouts, handling forms, animating stuff on screen or the usual platform-specific pains. Let's always improve the way we develop with React Native!