When creating a web application that interacts with an API, it is common to use a client library or write an API client manually that abstracts the API calls. This allows you to focus on the front end of your application without worrying about the details of the API like request headers, query parameters, and response handling. With that in mind, it is essential to keep the API client in sync with the API itself to avoid any inconsistencies or bugs.
What if you:
- didn't have to write the API client manually and keep it in sync with the API?
- get all the types, request parameters, response schemas, and API endpoints automatically?
- generate the API client from the API definition itself?
This is where OpenAPI/Swagger definition and Orval comes into play.
In this blog, we will generate an API client from OpenAPI/Swagger definitions using Orval and TanstackQuery as our API client library of choice in a React (NextJS) application.
Orval is a tool that generates API clients from OpenAPI/Swagger definitions, and TanstackQuery is a library that provides a set of hooks and utilities for making API requests in React applications. It also provides a way to access the data as you would with some state management libraries like Redux or Recoil but without the boilerplate. Together, they provide a seamless way to generate and use API clients in your React applications without much effort.
Let's get started!
Setup
As stated earlier, we will be using Orval and OpenAPI/Swagger definitions that we receive from our API provider. For this blog, we will use the Petstore API as our example API. The Petstore API provides a simple REST API for managing pets. You can find the OpenAPI/Swagger definition for the Petstore API.
To generate the API client, we need to install Orval and create a configuration file that specifies the input OpenAPI/Swagger definition and the output directory for the generated API client.
The example configuration file looks like this:
// orval.config.ts
import { defineConfig } from 'orval';

const defaultQueryOverride = {
  useQuery: true,
  signal: true,
  useSuspenseQuery: true,
};

export default defineConfig({
  project_name: {
    input: {
      target: './src/api/openapi.json',
      filters: {
        // you can filter the tags you want/don't want to generate using regex
        // e.g. match all strings that don't contain healthcheck
        tags: [/^(?!.*healthcheck).*$/],
      },
    },
    output: {
      // clean the output directory before generating the API client
      clean: true,
      // splits the generated files by tags
      mode: 'tags-split',
      // output directory for the generated API client
      target: './openapi-config',
      // output directory for the generated API types
      schemas: './openapi-schemas',
      // default directory to append to target/schemas
      workspace: './src/',
      // generate barrel files for src directory and schemas directory
      indexFiles: true,
      // client library to use for the generated API client
      // supported libraries: angular, axios, axios-functions, react-query, svelte-query, vue-query, swr, zod
      client: 'react-query',
      prettier: true,
      // generate mock data for the API client
      mock: false,
      // sets the default query options for all queries to be optional, useful for Orval + TanstackQuery integration (more info in docs)
      allParamsOptional: true,
      override: {
        // default query options for all queries
        query: {
          useQuery: true,
          signal: true,
          useSuspenseQuery: true,
        },
        operations: {
          // override query options for specific operations
          ["operation_id"]: {
            query: {
              ...defaultQueryOverride,
              useInfinite: true,
              useInfiniteQueryParam: 'page',
            },
          },
          ...
        },
        mutator: {
          // default api client definition
          path: './custom-client.ts',
          name: 'customClient',
        },
      },
    },
  },
});
In the configuration file, we specify the input OpenAPI/Swagger definition file, the output directory for the generated API client, and the client library to use for the generated API client. We also specify the default query options for all queries and override them for specific operations if needed.
The custom client definition allows you to customize the generated API client by providing your own implementation for the API client. This is useful when you want to add custom logic, authentication to the generated API client or use a different client library.
Example of a custom client definition:
// custom-client.ts
import Axios, { AxiosError, AxiosHeaders, AxiosRequestConfig } from "axios";
import { getAuth, getIdToken, signOut } from "firebase/auth";

export const AXIOS_INSTANCE = Axios.create({
  baseURL: process.env.NEXT_PUBLIC_BACKEND_API,
}); // use your own URL here or environment variable

// add a second `options` argument here if you want to pass extra options to each generated query
export const customClient = async <T>(
  config: AxiosRequestConfig,
  options?: AxiosRequestConfig
): Promise<T> => {
  // example authentication using Firebase
  const auth = getAuth();
  const user = auth.currentUser;
  let token: undefined | string = undefined;

  const headers = new AxiosHeaders();

  if (user) {
    token = await getIdToken(user);
    headers.set("Authorization", `Bearer ${token}`);
  }

  const source = Axios.CancelToken.source();
  const promise = AXIOS_INSTANCE({
    ...config,
    ...options,
    cancelToken: source.token,
    headers: {
      ...config.headers,
      ...headers,
    },
  }).then(({ data }) => data);

  promise.cancel = () => {
    source.cancel("Query was cancelled");
  };

  return promise;
};

AXIOS_INSTANCE.interceptors.response.use(
  response => {
    return response;
  },
  error => {
    // example of handling 401 unauthorized error with Firebase
    if (error.response?.status === 401) {
      const auth = getAuth();
      signOut(auth);
    }
    return Promise.reject(error);
  }
);

// In some case with react-query and swr you want to be able to override the return error type so you can also do it here like this
export type ErrorType<Error> = AxiosError<Error>;

export type BodyType<BodyData> = BodyData;
In the custom client definition, we define a custom client function that takes an Axios request configuration and an optional options object as arguments and returns a promise that resolves to the response data. We also define an Axios instance with a base URL and an interceptor that handles 401 unauthorized errors by signing out the user using Firebase authentication but you can use any other authentication method.
Now that we have our configuration file and custom client definition ready, we can generate the API client using Orval. To do this, we need to install Orval and run the following command:
curl https://petstore.swagger.io/v2/swagger.json > ./src/api/openapi.json && npx orval --config ./src/api/orval.config.ts && npx prettier --write ./src/api/ && rm ./apps/fe/modules/api/openapi.jsonThis command downloads the OpenAPI/Swagger definition for the Petstore API, generates the API client using Orval, formats the generated files using Prettier, and removes the downloaded OpenAPI/Swagger definition file. You can add this command to your package.json scripts for easy access.
After running the command, you should see the generated API client in the output directory specified in the configuration file. The generated API client contains all the types, request parameters, response schemas, and API endpoints defined in the OpenAPI/Swagger definition.
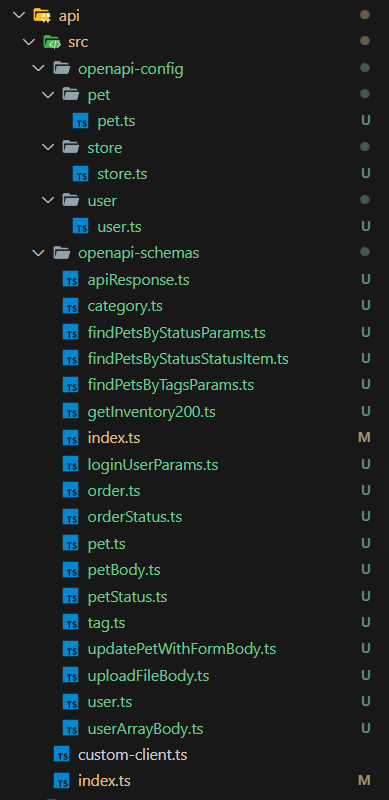
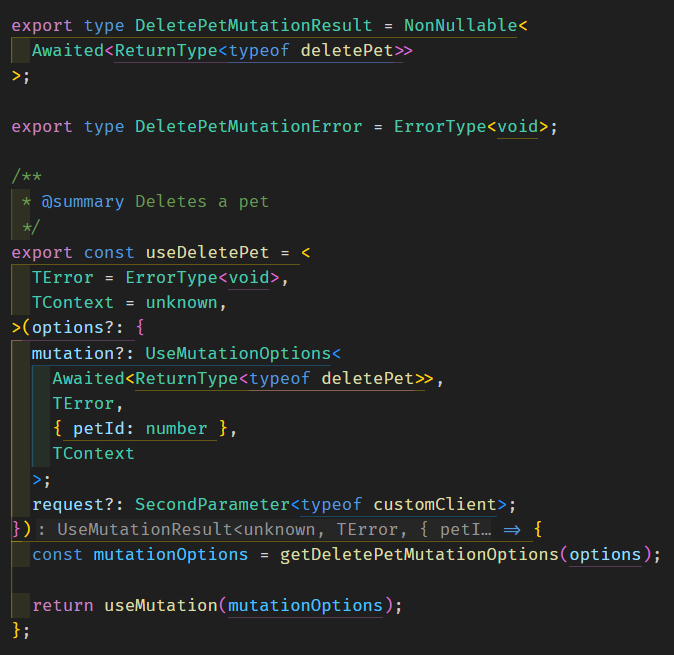
Generated folder structure / Example of generated Delete Pet hook
Example of the generated folder structure and API client using Orval and TanstackQuery
Each API endpoint is represented as a hook that you can use in your React components to make API requests. The generated API client also provides a set of utilities for handling loading, error, and data states for each API request.
Now that we have the generated API client, we can use it in our React application to interact with the Petstore API.
Using the API client in a React application
To use the generated API client in a React application we can just import the generated hooks and use them in our components. Here is an example of how to use the generated API client in a React component:
Fetching the data (Query)
// components/Pets.tsx
import { useGetPets } from "../openapi-config/pets";
import { Pets as PetsType } from "../openapi-schemas/pets";

const Pets = () => {
  const { data, error, isLoading } = useGetPets();

  if (isLoading) {
    return <div>Loading...</div>;
  }

  if (error) {
    return <div>Error: {error.message}</div>;
  }

  return (
    <div>
      <h1>Pets</h1>
      <ul>
        {data?.map((pet: PetsType) => (
          <li key={pet.id}>{pet.name}</li>
        ))}
      </ul>
    </div>
  );
};

export default Pets;
Creating a new pet (Mutation)
// components/CreatePet.tsx
import { useCreatePet } from "../openapi-config/pets";
import { Pet as PetType } from "../openapi-schemas/pets";

const CreatePet = () => {
  const { mutate, isPending, error } = useCreatePet({
    mutation: {
      mutationKey: "create",
      onSuccess: () => {
        alert("Pet created successfully!");
        // redirect to the pets page and invalidate the query cache
      },
    },
    request: {
      headers: {
        "Content-Type": "application/json",
      },
    },
  });

  const handleSubmit = async (event: React.FormEvent<HTMLFormElement>) => {
    event.preventDefault();

    const formData = new FormData(event.currentTarget);
    const pet: PetType = {
      name: formData.get("name") as string,
      tag: formData.get("tag") as string,
    };

    await mutate(pet);
  };

  if (isLoading) {
    return <div>Loading...</div>;
  }

  if (error) {
    return <div>Error: {error.message}</div>;
  }

  return (
    <form onSubmit={handleSubmit}>
      <label>
        Name:
        <input type="text" name="name" />
      </label>
      <label>
        Tag:
        <input type="text" name="tag" />
      </label>
      <button type="submit">Create Pet</button>
    </form>
  );
};

export default CreatePet;
In the example above, we import the generated hooks for fetching pets and creating a new pet from the generated API client. We use the useGetPets hook to fetch the list of pets and display them in a list. We use the useCreatePet hook to create a new pet by submitting a form with the pet's name and tag.
The generated hooks handle loading, error, and data states for each API request, making it easy to interact with the API in a React application. You can also customize the request headers, query parameters, and response handling using the options object passed to the hooks.
This leaves us with a clean and maintainable way to interact with the API in our React application without worrying about the details of the API and changes in the API definition over time since we can easily regenerate the API client anytime the API definition changes.
Why not use OpenAPI/Swagger Codegen?
In this blog, we learned how to generate an API client from OpenAPI/Swagger definitions using Orval and TanstackQuery in a React application. We saw how to create a configuration file for Orval, generate the API client, and use the generated API client in a React component to interact with the Petstore API.
The more complex your API becomes, the more beneficial it is to generate the API client from the API definition to avoid inconsistencies and bugs. Orval and TanstackQuery provide a seamless way to generate and use API clients in your React applications without much effort, allowing you to focus on the front end of your application as well as keeping type safety and consistency in your API client.
If you have any questions or feedback, feel free to reach out to us or check out the our other blogs on prototyp.digital.blog.